Thursday 22 October 2015

Literally The Easiest Last Minute Halloween Makeup Ideas EVER!

So it's the day before (or worse et - the day of) Halloween and you're one of those people who couldn't decide on a costume or just assumed something would jump out at you with inspiration...but your wishful thinking didn't quite work. Now you're in a panic because you're heading to a Halloween party in a few hours and you know everyone is dressing up! All your friends are talking about their costumes that they've been working on for weeks and you're about to blow all your money on the last costume available in the store just to save face.

Well put away your purse and stress no more! I have compiled a list of the easiest Halloween makeup ideas ever!! You could literally pull one of these off in 10 minutes and still look like you put in at least a bit of effort!

1. The Scarecrow

This makeup is so simple yet looks so perfect paired with some denim and a flannelette shirt! Add a straw hat or hair piece and if you want to keep it as a beauty look simply add some gorgeous curls to your hair and apply a glamour eye makeup!

Check out more information on this look at: Sarah & Elizabeth


2. The Cat

If you have ANY form of cat ear headband lying around your house you can create this look. Or even if you don't - I once made cat ears out of a regular headband, some sticky tape and black cardboard. Use some eyeliner to add a few whiskers, blacken your top lip and the tip of your nose - TA DAAAA! You're a kitty cat! Meow! 

Find this look at nicoleguerriero


3. The Doll

Creepy or Cute? Either way it makes for a simple Halloween makeup!! Add some freckles to your cheeks using a brown eyeliner pencil. White liner your water line and add pink lipstick to the centre of your lips. Tie your hair up into piggy tails and voila! You're a doll ;) 

This look can be found at Nathalia Kalil


4. Super Simple Harley Quinn

Create this super simple Harley Quinn makeup by filling in a messing black diamond shape over one eye using an eyeliner crayon and overextending some red lipstick on one side. SAH EASY!!!

Find this look at AllisonsPalace


5. The Mime

This is possibly the most low-key mime look EVER! Just slightly extend your eyeliner down to your cheeks and grab one of these hats. Bob's-Your-Uncle!

Find this look at Caitlin


I hope you all have an incredible Halloween for 2015!!! 

xoxo Bridgitte

Tuesday 22 September 2015

6 Ways To Wear Your Vampire Makeup Slightly Differently This Halloween

Hey Eyedolizers!!!

Halloween is just around the corner and all the costume and makeup options can get seriously overwhelming! So I will be doing posts up until Halloween to compile looks together and hopefully make your choices a bit easier.

Today's post is going to focus on another classic Halloween makeup - The Vampire!!!

Vampire costumes have been around since forever!!! And they can become a little boring, normal or standard. So here are 6 ideas on how to slightly "vamp up" (if you will), your vampire makeup for this Halloween!

1. The Sexy Vampire

This is a look that I think most females attempt to achieve at one point or another in their trick or treating life! But it can be done wrong, VERY WRONG!! So I suggest taking a page out of Linda Hallberg's book by creating a dark plum smokey eye, pair it with a red lip, throw in some vampire fangs and red contacts! And finish it off by running a teasing comb through your locks and pop on a lacy black dress - BAM! Sexy Vampire in a few easy steps. I do want to point out though that I think the addition of the red contacts for this look is pretty important - it really adds that difference to a standard vampire look.

Find this look at Linda Hallberg


2. The Drawn on Fangs

Let's be honest, those vampire fangs can get annoying!! Especially if you are attempting to eat all of your Halloween candy! So why not try this little trick from Depeche Gurl and paint them on? This way you remove the hassle of constantly having to glue your fangs back in, you can still speak normally, AND it's super simple to create this look!

Find this look at Depeche Gurl


3. The Recently Transformed Vampire

LOVE this look by the beautiful Desi Perkins. Just by adding a bite wound to the neck you create a whole new character for your vampire. And with a little bit of blood dripping down next to your mouth it's as though this lady has recently become a vampire and just tasted her first victim. Note once again the addition of contacts, these white ones are a beautiful touch and really add to the effectiveness too! 

Find this look at Desi Makeup


4. Vampire Bride

This look will generally be a bit more extravagant and take some more planning and props to pull it off right, but I think the addition of a white outfit to a vampire makeup really sets it off! You can always pick up a cheap wedding dress from an op shop to create this look and add a few drops of blood around the mouth and some fangs for a simple vampire makeup to accompany your amazing ensemble! 

Find this look at Iberian Black Arts


5. The Vampire Diaries Inspired Vampire

Why not stick to our generation, because let's face it, there are a million and 1 vampire shows and movies around nowadays! How about recreating this incredible Vampire Diaries inspired makeup by the beautiful Kelly Marie. She shows you how to create it in an incredibly simple to follow tutorial.

Find this look at MissKMarieXo


6. The Female Dracula Vampire

Or male!! If you are one! But I wanted to add in this awesome create by the incredibly talented Julia Graf. This is more of a traditional, scary vampire look and I love the addition of the high collar costume. Add some purples, reds and blacks to your eyeshadow and make it BOLD! Then once again, pop in some fangs...add a little extra blood dripping around your mouth than you would for some of the other looks - this vampire is fierce!!!

Find this look at Julia Graf


And so concludes my little guide to your slightly different Vampire looks for this Halloween. I hope if you were planning on going as a vampire that this has been of some assistance to you :) And make sure to follow this blog for my upcoming Halloween idea posts!

See you soon for more CREEPY ideas! 

xoxo Bridgitte

Friday 24 July 2015

8 Ways to Make Your Halloween Skeleton Makeup Feminine & Beautiful

We all know that a skeleton or skull makeup is an absolute classic and timeless Halloween favourite. And with all the amazingly talented makeup artists in the world there are certainly a growing number of ways to make your skeleton makeup stand out when Halloween comes around. Here is a collection of 8 of the most beautiful and unique ways to wear you skull makeup to give you a beautiful and feminine touch on a normally black and white look.

1. A Basic Half-Face Skeleton with a Flower Crown

This look is incredibly easy to recreate and can be done by applying your standard base makeup, a black smokey eye that extends over your eyebrow, and some strategic placement of black lines to one side of your face. Add a crisp red lip to the other half and top it off with a large flower crown! Voila! So simple, so beautiful!

Find this look at Sunkissedandmadeup


2. A Regular Black & White Skeleton but with Coloured Hair!

Skeleton makeups are so effective and bold on their own that just the simple addition of a bit of colour can seriously make this look POP! Apply your regular black and white skull and then dye your hair a crazy colour (literally any colour will look great with it). Or if you're lucky enough to have light blonde hair throw in some hair chalk which you can wash out the next day! And there is always the option of buying a cool wig for a quick colour change option.

Find this look at SheLookBook


3. Extremely Subtle Skeleton Makeup

Something about the extreme subtleness of this look just makes it so feminine and delicate to look at. An easy look to recreate for a last minute Halloween Skull makeup!

Find this look at Sokolum


4. Bling Sugar Skull Makeup

Technically not a Halloween makeup, but actually a decoration used during Day of the Dead celebrations in Mexico. However, in recent years it has become more common for people to wear something resembling sugar skulls for Halloween. I don't believe this is meant to offend in any way but actually believe that people began wearing this type of makeup as a beautiful alternative to the normal scary skeleton look. Here is an example of a beautiful way to wear a sugar skull, simply by using one feature colour and some sequins - how stunning is this!

Find this look at Makeup Your Jangsara


5. Glow In The Dark Skeleton Makeup

Once again, this looks more like a Sugar Skull makeup, however you could simply add some glow in the dark products to a regular skeleton makeup for a seriously cool effect! Especially if you are heading out for some night-time trick or treating, or to a Halloween party! You'll definitely stand out on the dance floor with this look!

Find this look at Ashley Meagher Makeup Design


6. Half Skeleton, Half Marilyn Monroe

A beauty icon, crossed with a Halloween classic. This is definitely a genius way to make your skeleton more feminine this Halloween! This beautiful half skull, half marilyn monroe look was created by the incredibly talented Sarah Chambers.

Find this look at Sarah Chambers


7. Lower Half Face Skeleton

This lower half face skeleton still allows you to have a sexy smokey or cat eye look. And note the addition of slightly purple tinged hair! A stunning makeup for Halloween.

Find this look at Chrisspy


8. Rainbow Skeleton Makeup

And last but not least - another EyedolizeMakeup original. The addition of rainbow to any skull look is just awesome! Try out this awesome melting skull look for a definite difference this Halloween. Alternatively you could create rainbow hair using hair chalks, or have someone else splatter rainbow face paint across your face and neck for a completely different rainbow skull effect!

Find this look at Eyedolize Makeup


I hope this has helped you on your quest to become a beautiful and feminine skeleton this Halloween! 

Happy trick or treating! 

xoxo Bridgitte

Sunday 19 July 2015

10 Absolutely Stunning Rainbow Makeup Designs

How beautiful and magical are rainbows?! And how amazing is it that we can wear them on our faces?! Here is a collection of 10 of the most beautiful rainbow makeup looks on the internet. A mixture of looks that could be great for kids parties, pride parades or just because you LOVE rainbows!

This first look is incredibly simple to create, and for such a little amount of detail it really creates a beautiful and effective rainbow look, without being OTT. 

You can find this beautiful look at Bows and Curtseys


Or take it a little higher, add some glitter and create some beautiful rainbow glitter eyebrows!!

Find these glitter brows at GlitterGirlC


If you're feeling super daring then why not try out this STUNNING full face dripping rainbow makeup by the incredible talented MadeULook. She has created this look specifically for pride purposes but it could definitely be used for a kid's party or even a cool, bright Halloween makeup.

Check out more of this beautiful look at MadeYewLook


Or for those kids who don't want to sit still that long but still want an amazing rainbow makeup, why not try out this beautiful rainbow butterfly face paint!

Find this and more amazing face paint looks at Amanda's Elaborate Eyes


And bringing it back to basics a little more, this rainbow lipstick look would be great for a pride parade if you were wanting something simple and didn't have a whole lot of time to spend painting rainbows on your face!

Find this rainbow lipstick look at Euphoria


Now rainbows are already incredible bright but if you crave BRIGHTER then this is the look for you! This neon rainbow eyeshadow will definitely have you standing out!

Find this neon rainbow eyeshadow look at XSparkage


OR go the opposite way and soften the rainbow down a bit by making it a pastel style eyeshadow.

Find this beautiful pastel rainbow eyeshadow at Maryam Maquillage


This simple but really cool festival makeup is super wearable and is very eye-catching!

Check this look out, including full output inspo to go with it at Kristen Leanne Style


If you just don't really posses the artistic makeup skills then why not grab some of these rainbow lashes and create a quick and easy rainbow eyelash look!

View more of this lash look at Queen of Blending


And last but not least is an EyedolizeMakeup original creation! Why not try out these rainbow scale pattern lips for your next rainbow themed event?! I promise they are WAY easier than they look :)

Find this look (and more rainbow looks) at Eyedolize Makeup YouTube channel


As you can see there are SO many different rainbow creations out there to try! Let me know which of these looks is your favourite by leaving a comment below :)

xoxo Bridgitte

Monday 13 July 2015

Should You Book A Ride On The Naked Sleeper Bus?!

Hey there!

Welcome back to my journey around the world...don't forget to follow my blog if you want more useful hints and tips and to checkout where I am and what I'm getting up to right now :)

So last night I had my first experience on New Zealand's first Naked Sleeper Bus! Firstly, I was a little surprised when I showed up in my birthday suit, having braved the 0 degrees temperatures of Wellington, only to find that it's not literally a naked bus!! Could have avoided so much embarrassment and frostbite! Haha I kid, of course!

Source: nakedbus.com
I have to say, the week leading up to my sleeper bus trip I was actually really excited! I'd caught the Mana bus down from Auckland to Wellington and while it was quite nice to be given an icy pole and water, sitting up on a slightly (and I really exaggerate that point) reclined chair for 10 hours makes for an extremely uncomfortable sleep and sore back the next day!

So when I booked the sleeper and read all about the free Wifi, USB charging points and onesies - while having a flat bed to lie on all night, well this little backpacker was ready for a night of luxury!!

Okay so now I need to fill you in on what they DON'T mention on the website. I've decided to compile this into a list of pros and cons of the naked bus to make it easier for you.

PROS:

  • The blankets look thin but are EXTREMELY warm
  • You get to lie down (what you always wish/moan for on a normal overnight bus trip)
  • The staff & bus driver are really friendly and helpful
  • There's a toilet onboard
  • There are regular stops in case you need to stretch your legs
  • You can charge any of your devices that you can attach a USB charging cord to (probably not laptops (I couldn't charge mine))
  • The bus is very clean
  • The linen is very clean
  • The pillows are relatively comfortable (a bit too soft for my liking but if you like a soft pillow, you'll be happy!)
CONS:
  • They don't actually tell you until you're on board that if you are on the bottom row of beds you will probably be sleeping next to a stranger that they pick up at the next stop. I don't have a massive problem with this, I'm sure most people getting on this bus are lovely and clean but there is always the off chance you'll end up next to someone who has been backpacking for a week and hasn't managed to find a shower in that time and has a faint (or overpowering) scent of urine about them. OR you'll end up next to someone like me! Who kicks, snores and happened to have a tickly cough this particular night of my trip.
  • I REALLY think they need to advertise somewhere on their website that just because you pay the same price as everyone else does not mean you will necessarily have a bed to yourself.
  • If you have claustrophobia don't even think about booking this bus! I suffer mildly from it (an underground carpark with a particularly low roof is enough to send me into a panic attack) and I have to tell you, the minute I stepped on this bus I thought about getting off and using the McDonalds free wifi to book a plane ticket back to Aucks. The aisles are SO skinny that you literally cannot pass another person, so you will have to wait while they unpack their teddy bears and phone chargers. And the space between the bottom bunk and top bunk is nowhere near close enough to allow you to sit up. The space between the top bunk and roof is only slightly bigger.
  • As I said in the pros they do have a toilet onboard, but they emphasise SO much once you're on board that you should really try to not move around the cabin while the bus is moving that you become too scared to use the toilet anyway. Also if you're on a top bunk, there is no ladder to get down, instead you will have to use the person on the lower bunk of the opposite side of the bus's bed as a ladder, potentially waking them up if they are somehow lucky enough to fall asleep (If they are asleep, they've probably read this blog and took sleeping tablets :P)
  • There is absolutely no temperature control, you don't get your own heater above your bed, it's just one temperature for the whole bus for the whole trip - I was having massive waves of overheating and then freezing.
  • It's a VERY bumpy ride, at least the trip I was on anyway, maybe it's just that road (Wellington to Auckland) because of the bumps it's really hard to get any sleep (I'd suggest taking sleeping tablets)
  • They advertise free Wifi onboard, which they do have and I assume it works fine but our staff member forgot to tell us the password until halfway through the trip and then proceeded to announce it over the speakers (which are directly above each person's head) while people were sleeping...needless to say, majority of the bus jumped so far out of their beds they hit the roof or the bed above them (okay, so they didn't jump super high then :P)
  • Lastly, they also advertise food and refreshments, not a single beverage or snack was seen by me or anyone else on the bus, luckily I had been waiting inside a McDonalds for the bus to arrive in Wellington and devoured a Big Mac right before boarding.
A pic I took from inside the bus so hopefully you can get an idea for the size
Now it sounds as if I am MASSIVELY bagging on the Naked Sleeper Bus, but I do want to mention that I only paid $30 for the ticket - which is a heck of a lot cheaper than booking a hotel with even worse conditions for a similar price. I actually got to lie down, which is really all anyone riding on an overnight bus wants, right? I really just wanted to get the facts out there that they don't mention on the website so that if you are planning on booking a trip on it you can make up your own mind with ALL the facts.

I think it really will be the way to travel in the future and for the first one in NZ they've done a pretty good job. And I'm sure once they've done a bunch of perfecting the trips will be amazing!

Wishing you wonderful adventures and safe travels :)

xx Bridgitte

Sunday 5 July 2015

My First Week In Aucky Auckland!!!

Hey there! So if you are a follower of my YouTube channel then you will probably know that last week I set out on my solo world adventure! That's right I am spending the rest of this year travelling through New Zealand, Canada, America, the UK, Europe and Japan...I realise that's a lot of places to cram into half a year and to be honest, if my funds will stretch far enough I don't really know when I'll head home.
 bye bye Brisbane!!!

 Auckland bound!

So the adventure has begun in New Zealand, in beautiful Auckland to be more precise. I was lucky enough to have met a YouTuber through a collaboration about a year ago and her and her husband moved to Auckland earlier this year. They were kind enough to offer to put me up for a month. And let me tell you, when you're travelling the world, you don't turn down any offer for a place to stay for free (or cheaper than would be in backpackers/hotels).

I arrived in Auckland on a Saturday night, Jessie and Chris picked me up from the airport and we spent the remainder of the evening enjoying a French dinner with her nan and a bunch of her nan's friends who were extremely well travelled and had many stories to tell which got me even more excited for the trip I have ahead.

On the Sunday Jessie took me out exploring through Auckland city for an hour or so. Later on in the week I took a trip back myself to do explore even more. It is an absolutely beautiful place with many different types of neighbourhoods. You walk a few streets and it's like you've walked from one land to another. In my favourite area, Britomart, you'll find quirky cafes, funky bars and restaurants and people sitting on bean bags in big outdoor grassy areas amidst the big corporate buildings.

Britomart - my favourite spot in Auckland

Britomart Indoor Atrium - upstairs is a whole row of banks, but in Auckland their banks have areas setup just to sit and have a coffee, or glass pods you can go and sit inside for a more private conversation.

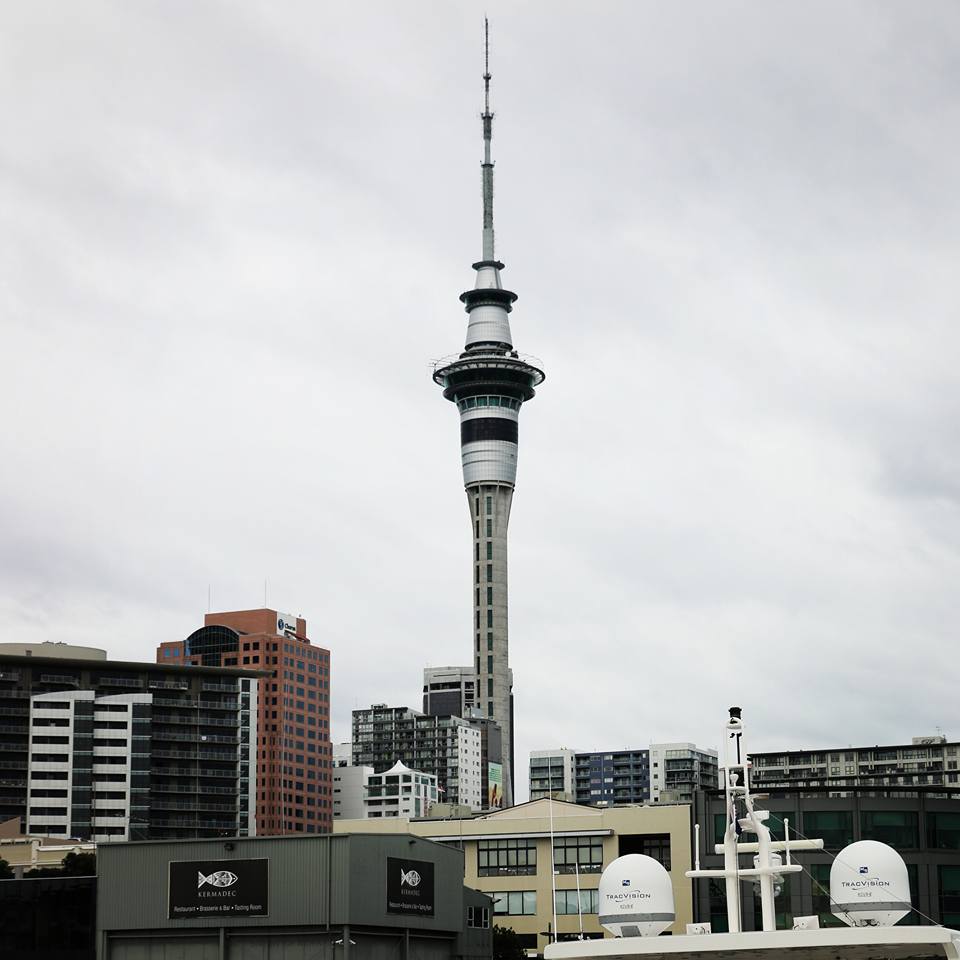
Walk a few streets West and you'll find that the feeling has completely changed to that of full on inner city bustle. It's a lot busier in these areas and you will find quite a few homeless people here asking for money. This is also where you can view the infamous SkyTower and if you're feeling game enough you can walk around the edge of the top or for the super adrenalin junkies you can leap off the edge! I would definitely put myself in the super adrenalin junkie category, but unfortunately they do charge quite a bit for you to step off a building....and backpacker budgets don't quite stretch that far!

Auckland City - SkyTower (expect to see a lot of spam of this building)

Now walk West for a few more blocks and you come to the super cool waterfront area of Auckland. If you're as lucky as me you might get to see a baby seal just hanging out on the steps in the middle of the day! 

This was so exciting for me! haha
This is another one of my favourite spots. The Wynyard Quarter has been designed to promote sustainability and green living. They have installed beautiful gardens and playgrounds but have also kept some of the original industrial areas which really adds to the history of the area. It is filled with choices of waterfront restaurants to grab a meal or have a beer while watching boats and sailing ships glide past. They have turned things like shipping containers and tanks into both interactive and visually beautiful art. 

In one shipping container you can leave a note on a string board which I did and it felt really cool, like I was actually leaving a part of my world story in Auckland. 

"Travelling the world! First stop beautiful Auckland!" - Bridgitte, EyedolizeMakeup


Massive day beds they've constructed which fill up an area in between the arty shipping containers
In another area they have commissioned poets to write short poems and have had them painted onto the side of tanks. 

Some of the poetry tanks
And some more poetry tanks :)
You can also climb up any number of steel stairways they've added on the edge of this really stunning area and take a photo of the view from a little but higher.

One view of part of the Wynyard Quarter from the steel steps
Along the walk you will see some truly cool, quirky things.

Amazing building in Wynyard Quarter...still don't know what this was made from but it looked amazing! 
This was a really random carved chair...I'm probably just missing Greg but it kinda looked like a pug to me :P
Along the walk you'll find a few different love-lock bridges :)
And the people of Auckland (or the world) have added their own marks on some parts! I hope Mr. Ed found love! 

There is literally art to see every direction you turn :)

And after a MASSIVE day of walking I felt I deserved a true New Zealand style drink with a Mac's cider :)

Chilli + Lime is flippin' delicious!!
I walked for hours that day but I still feel as though there is so much more of Auckland for me to see! I'm off to Wellington this week and will have a blog post update on my adventures there coming soon. But when I do make it back to Auckland I'll see what other treasures I can find :)

Follow my blog for updates on my world travels & leave me comments below if you have any questions or suggestions of places I should check out while I'm in Aucks or Welly!

xx Bridgitte

Tuesday 30 June 2015

An Easy Bunch of Batman Character Tutorials - Take Your Pick for Halloween!

Hey there! So Halloween is coming up again - I realise it's still a few months away but it is my favourite time of year and I tend to get too excited to wait until Halloween to start deciding on costumes and playing with looks. So I started a Batman series on my YouTube channel and I will DEFINITELY be adding more looks to the series but here is what I have created so far.

Each tutorial is easy to follow so you can recreate your favourite one for Halloween!

BATMAN MASK: First up, the classic, a mask inspired by the man himself and a super easy creation of it. The great thing about this mask is that it is so gender neutral that it is fun for a girl and a boy (old school slinky reference - who got it? :P ).

Full tutorial here: Batman Makeup/Face Paint Mask


TWO FACE MAKEUP: A fantastic villain look and a really effective makeup that will definitely leave people talking about your awesome Halloween costume for a while :) 

Full tutorial here: Green Two Face Makeup Tutorial


CATWOMAN MAKEUP - This tutorial shows you how to create the old-school cat woman look. I will probably also do an updated one (more like the Anne Hathaway version) soon as well.

Full tutorial here: Catwoman Makeup Tutorial


BANE MAKEUP MASK TUTORIAL - Definitely one of the more difficult ones and I would only recommend doing this one if you have at least 2 hours free to apply your makeup before you head off to your Halloween event. Also practice your Bane voice or walk around using dubsmash the whole time you're wearing this look. The Bane voice is HARD! haha

Full tutorial here: Bane Makeup Mask Tutorial


So these are my creations so far. I will be adding more to this series as I am receiving HEAPS of requests, mainly for Harley Quinn and The Joker. Leave me a comment below if you have a particular Batman character you want to see and subscribe to the Eyedolize Makeup YouTube Channel if you want updates on the new videos :) 

xoxo Bridgitte